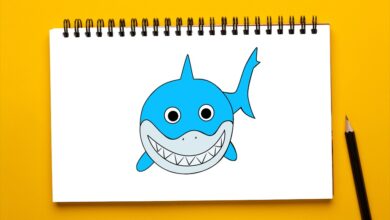
Drawing is a delightful way to express creativity, and one of the most enjoyable subjects to skin:ivl5ranfvva= fortniteis the cute shark. Combining the mystique of the ocean with an adorable twist, cute shark drawings captivate artists of all ages. In this guide, we will take a deep dive into the world of cute shark drawing, exploring techniques, tips, and step-by-step instructions to help you create your own charming shark masterpiece.
Introduction to Cute Shark Drawing
Sharks, often perceived as fearsome predators, can also be portrayed in a cute and endearing manner. This artistic approach softens their intimidating features and brings out a playful, almost cartoon-like quality. Cute shark drawings are not only fun but also a great way to practice basic drawing skin:ivl5ranfvva= fortnite such as shapes, proportions, and shading.
Why Draw Cute Sharks?

Drawing cute sharks can be both entertaining and educational. It provides a unique challenge by transforming a typically menacing creature into something lovable. This exercise helps improve artistic skin:ivl5ranfvva= fortnite , such as observing and simplifying complex shapes, and it’s a fantastic way to engage children in art. Moreover, the final result is often so charming that it can be used for various purposes, from decorating a child’s room to creating adorable greeting cards.
Materials Needed
Before we dive into the drawing process, let’s gather the necessary materials. Here’s a basic list:
- Paper: Any type of paper will do, but heavier paper like sketch or watercolor paper is preferable if you plan to add color.
- Pencils: Start with a range of pencils from HB for sketching to 2B or 4B for shading.
- Erasers: A kneaded eraser is ideal for lightening areas without leaving residue.
- Fine liners or Ink Pens: For outlining your drawing.
- Colored Pencils, Markers, or Watercolors: To add color to your cute shark.
Having these materials on hand will ensure you’re ready to create a beautiful drawing from start to finish.
Step-by-Step Guide to Drawing a Cute
Now that you have your materials ready, let’s start drawing! This step-by-step guide will walk you through the process of creating an adorable shark.
Step 1: Basic Shapes and Outlines
Begin by skin:ivl5ranfvva= fortnite the basic shapes. Draw a large oval for the body, a smaller circle for the head, and two triangle shapes for the fins. These shapes don’t need to be perfect; they are just guides to help you proportion your shark correctly.
skin:ivl5ranfvva= fortnite the Body
The body of your cute shark is the main structure. Draw a horizontal oval in the center of your paper. This will be the torso. Next, add a smaller circle at one end of the oval for the head. Make sure the head is proportionate to the body—larger for a cuter effect.
Adding the Fins
Sharks have several fins, but for a simplified cute version, we’ll focus on the dorsal fin (on the back) and the pectoral fins (on the sides). Draw a large triangle on the top of the oval for the dorsal fin. Then, draw two smaller triangles on each side of the body for the pectoral fins.
Step 2: Defining the Shapes
With your basic shapes in place, it’s time to define . This means adding details to your initial skin:ivl5ranfvva= fortnite to make it look more like a shark.
Refining the Head and Body
Connect the head to the body smoothly, giving it a streamlined look. Sharpen the lines of the head, adding a gentle curve to where it meets the body. For a skin:ivl5ranfvva= fortnite effect, make the head slightly larger in proportion to the body.
Shaping the Fins and Tail
Define the dorsal and pectoral fins, making them skin:ivl5ranfvva= fortnite and less sharp. Add a small, curved line at the end of the body for the tail fin. Cute shark drawings often have exaggerated, rounded fins and tails, giving them a softer, friendlier appearance.
Step 3: Adding Details
Details are what bring your cute shark to life. This includes the eyes, mouth, and additional fin details.
Drawing the Eyes
For a cute look, the eyes should be large and expressive. Draw two big circles near the top of the head. Add smaller circles inside for the pupils, and don’t forget to leave a tiny white spot to create a gleam, making the eyes appear more lively and adorable.
Creating the Mouth
A smiling shark is a cute shark! Draw a curved line for the mouth, making it broad and slightly upturned at the ends. Adding a few small, rounded teeth can enhance the cuteness.
Finishing the Fins and Tail
Add some lines on the fins and tail to give them texture. These lines should follow the natural curve of the fins and tail, enhancing their three-dimensional appearance.
Step 4: Inking Your Drawing
Once you’re satisfied with your pencil sketch, it’s time to ink it. Use a fine liner or an ink pen to go over the pencil lines. Be careful and take your time to avoid smudging.
Outlining the Body and Fins
Start by outlining the main body and fins. Keep your hand steady and follow the curves closely. If you make a mistake, don’t worry; you can always correct it later.
Adding Final Details
Go over the eyes, mouth, and any other details you’ve added. Make sure to ink all the lines that define the shape and features of your cute shark.
Step 5: Erasing Pencil Lines
Once the ink is dry, gently erase the pencil lines. This will leave you with a clean, crisp outline of your shark, ready for coloring.
Ensuring Clean Lines
Use a kneaded eraser to lighten any stubborn pencil marks. This type of eraser is gentle on paper and won’t smudge the ink.
Preparing for Coloring
Make sure your drawing is completely free of pencil marks before you start coloring. This will ensure your colors stay bright and clean.
Step 6: Coloring Your Cute Shark
Coloring brings your cute shark drawing to life. Whether you use colored pencils, markers, or watercolors, the key is to use soft, playful colors to enhance the cuteness.
Choosing Colors
For a cute look, opt for lighter shades of blue, grey, or even pastel colors. You can also add a touch of pink to the cheeks or fins for extra charm.
Applying Color
Start by coloring the body and head. Use gentle, even strokes to fill in the area. Next, color the fins and tail, using slightly darker or lighter shades to add depth and dimension.
Adding Highlights and Shadows
To make your drawing pop, add highlights and shadows. Use a white colored pencil or gel pen to add highlights, especially around the eyes and on the fins. For shadows, use a slightly darker shade of your main color and apply it to the underside of the body and fins.
Tips and Techniques for Enhancing Your Drawing
Drawing a cute shark is a delightful experience, but there are always ways to enhance your artwork. Here are some tips and techniques to take your drawing to the next level.
Experimenting with Different Poses
While a side view of a cute shark is common, try experimenting with different poses. A front view with the shark looking directly at the viewer or a playful pose with the shark flipping or turning can add variety to your drawings.
Adding Background Elements
Enhance your drawing by adding background elements. Simple waves, bubbles, or coral reefs can create a more dynamic scene. These elements don’t need to be detailed—just enough to suggest an underwater environment.
Using Reference Images
Don’t hesitate to use reference images. Studying real sharks and other cute shark illustrations can provide inspiration and help you understand their anatomy and movement. This knowledge can be translated into more believable and engaging drawings.
Practicing Consistently
Like any skill, practice makes perfect. Draw cute sharks regularly to improve your technique. Over time, you’ll find it easier to capture their adorable essence and experiment with different styles and poses.
Advanced Techniques for Cute Shark Drawing
Once you’re comfortable with the basics, you can explore advanced techniques to further refine your cute shark drawings.
Mastering Proportions
Cute drawings often rely on exaggerated proportions. Practice adjusting the size of the head, fins, and eyes to find the most appealing balance. A larger head and eyes with a smaller body and fins usually create a cuter look.
Exploring Different Mediums
Don’t limit yourself to just pencils and markers. Experiment with watercolors, pastels, or digital art tools. Each medium offers unique possibilities for texture, color blending, and overall style.
Developing a Personal Style
As you gain confidence, start developing your personal style. This could mean adding unique features to your sharks, such as quirky expressions, distinct patterns, or creative accessories like hats or scarves. Your style is what will make your drawings stand out and become recognizable.
Incorporating Movement
Adding a sense of movement can bring your drawings to life. Experiment with different poses and positions that suggest swimming, jumping, or playing. The way you position the fins, tail, and body can convey different actions and emotions.
Cute Shark Drawing for Different Skill Levels
Whether you’re a beginner or an advanced artist, cute shark drawing can be adapted to fit your skill level. Here’s how to approach it at different stages of your artistic journey.
Beginners
If you’re just starting, focus on mastering the basic shapes and outlines. Keep your drawings simple and don’t worry too much about details. Practice frequently to build your confidence and refine your technique.
Simple Shapes and Basic Lines
Start with simple, clean lines. Use basic shapes to construct your shark and gradually add more details as you become comfortable. Avoid getting bogged down with perfection—just enjoy the process.